There are only a few days left to receive the Reyes Magos (the Magi). For those of us that follow this magical tradition, this year we have the luxury of celebrating it as God intended, which falls on Saturday.
We will take my five-year-old nephew to the park on Friday to collect herbs in an empty box and leave it under the tree or next to his bed to feed the camels of the Kings who will arrive at dawn with their gifts.
On Saturday, after doing a light ritual of incense and myrrh, we will open the gifts and celebrate a dinner with family and friends. If we were in Puerto Rico, the celebration would be in the countryside with typical music.
It’s curious that for many nationalities, the gifts that “the Reyes bring” are always educational or noble, like shoes, food, books, clothes and even a toy with some teaching. I think that comes from the term “Magos”, which according to Catholic tradition, refers to wise men and philosophers.
The origin of the Rosca de Reyes
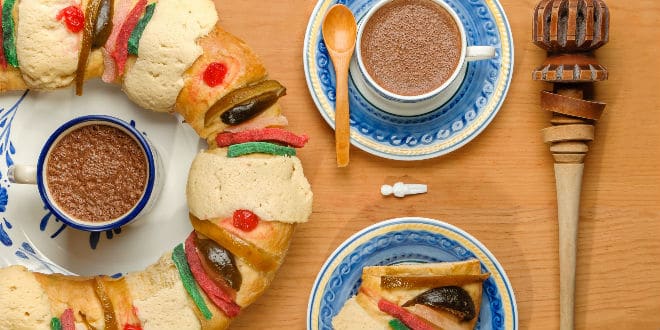
For my friends from Spain and Latin America, the celebrations bring sweets. They celebrate with the rosca o roscón de Reyes, a fruit bread laden with a thousand-year-old religious tradition, which was born in France, kept by Spain and then adopted by Mexico and the rest of the Latinos.
It’s shared with family and friends. Hidden inside the fruit bread is the small figure of a child, as a symbol of hiding Jesus from Herod (according to the biblical passage).
In Spain, whoever finds the child, pays the money. In Mexico, whoever finds it has a celebration with tamales on February 2, Candelaria Day.
The options to prepare the fruit bread are endless. From adding almonds, candied fruits, powdered sugar, orange, liquor, raisins, truffles and I have even seen them in chocolate in Peru. If you add the figurine, remember that it must be of a “baked” material and you must hide it well inside the dough.
Whatever your nationality may be, this Saturday, January 6th, gather your friends and family and let the tradition never die.
Happy 2018 and have a delicious Día de Reyes!
Recipe to prepare the Rosca de Reyes
Ingredients for 16 servings
1/2 cup of warm water
2 1/4 teaspoons = 7 grams of active dry yeast
4 cups of wheat flour and a little more to sprinkle
3/4 cup sugar
3 whole large eggs
3 egg yolks mixed with 2 tablespoons of milk
1/4 teaspoon of salt
1 1/2 tablespoon of orange extract
1 1/2 stick of butter without softened salt (equal to 6 oz or 3/4 cup)
Extra butter to spread the bowl and the plastic with which the dough is going to be covered while resting
Orange zest
For decoration
1 egg yolk
3/4 cup of all-purpose flour
6 tablespoons of margarine
1/2 cup of powdered sugar
Fig dried fruit, candied orange, quince paste cut into strips and / or cherries
1 beaten egg for bread glaze
1 tablespoon milk or water
White sugar to sprinkle bread
2 or 3 plastic dolls
Preparation
Place the warm water in a bowl and sprinkle the yeast; Mix with a fork until the yeast dissolves. Once dissolved let it stand for 5 to 10 minutes (bubbles usually form after that time).
Add 1/2 cup of flour and mix; Cover the container with a plastic and let it rest in a warm place until it doubles in volume (approximately 25 minutes).
In a large bowl, mix dry ingredients such as flour, sugar and salt first. Once mixed, add the eggs, the orange extract, the orange zest and the butter, and integrate everything very well. (If you have a pedestal blender available, use it for this process).
Add the yeast mixture to the mixture of dry ingredients and stir very well. (The mixture will feel sticky). Place the mixture on a floured surface and begin to work it until a smooth dough is obtained. (Do not put too much flour in this step as it will result in very dry bread).
The dough should be very moist and elastic (although the pictures do not show much), so do not put much flour to the table where you are going to handle it; just put the flour necessary to shape the dough. The process to achieve this result will take 15 to 20 minutes. (If you knead it in the pedestal mixer it will take about 7 minutes).
Once the dough is soft and elastic place it in a bowl spread with butter, and cover it with plastic spread with butter also for the first period of rest. Let the dough rest in a warm place until it doubles in volume (about 1 hour and a half).
Make sure your kitchen feels warm to help the dough sponge. If the hour and a half have passed and the mass has not risen, leave it for longer. The flavor of the bread develops in the fermentation process, so if you give it the necessary time you will have better results.
While the dough is at rest, prepare the ingredients for the decoration: Mix the margarine with the powdered sugar until it is creamy. Next, add the flour and egg yolk to form a homogeneous paste.
After the first time of rest put the dough on a lightly floured surface and kneaded lightly to integrate. Also, remember that it has to be a very loose and watery mass to be able to shape it into a round cushion and make a hole in the center in the shape of a large ring.
Transfer the dough to a baking tray – previously greased with butter – and cover the dough with a plastic spread with butter. (Be careful not to press the dough). Let it rest in a warm place for 45 minutes while you gather the ingredients for the decoration and bates the egg with milk or water for the varnish very well.
With the help of a kitchen brush varnish the dough with the egg mixture twice. Stir the decoration strips with the icing sugar and decorate the dough. (To form the decoration strips just place a small portion of the mixture between your hands). Put some of the dried fruit on the dough by pressing gently.
Sprinkle the cake with sugar and bake the first 10 minutes at 375 ° F (190 ° C); then reduce the temperature to 350 ° F (180 ° C), and bake 10 more minutes until the bread has a nice golden color. (It may be that time varies depending on your oven, some readers report having baked it for up to 30 minutes).
Transfer the thread to a rack and let it cool. After it has cooled, insert the plastic dolls in the bottom.